Thursday, May 21, 2015

COMPENDIUM OF CURIOSITIES - Challenge 28

Compendium of Curiosities 
Challenge #28 - Ombre Effect

Hello again from Joi.  Today is for sharing my newest learning experience. It was rather fun! This challenge from Linda Ledbetter's Studio L3 is to use the technique on page 57 of Compendium of Curiosities Vol. III by Tim Holtz. 

You may ask... what is that technique?  Heheheh - I can't tell you. Isn't that fun!!!????  But you can buy the book.  In fact, Tim Holtz will send you an autographed copy if you really want to know.  It's such a fabulous book. I keep reading it over and over.

And I have to tell you - if you want to see some of the cutest super sleuth pictures EVER - look at the Curiosity Crews (click here) pictures. They crack me up and they have all been so sweet to me.

If you click below - you can see their amazing project presentations for Challenge 28 - Ombre Effect. Can you choose a fab? I couldn't!

And it's also an exciting challenge because there is a PRIZE!!!! 
It's a gift certificate from The Funky Junkie Boutique (visit here). What fun it would be for me to get to go shopping there. 

The Funkie Junkie Boutique

Sooooooooooo.... this technique is called the Ombre Effect.  Now... here's some gossip for you.  Even though I really do have a Master's Degree... I did NOT know what an ombre effect was at all.  Dear me!!!  WHERE have I been?? 

Here is my Ombre Effect Design. 


The colors I used were:
Wild Plum - Purple Twilight - Eggplant

Since I am relatively new to working with inks... this took me awhile and was very interesting.  In the end... I experimented on several different surfaces to see how the technique worked.  And decided it would be fun to use all of them together in the project.


As you can see in the picture, I used:
Distress Watercolor Cardstock
Distress Specialty Stamping Paper
Photo Paper
Watercolor Canvas (Fabric)


Each type of surface looked a bit different.  The only one that was different in color was the watercolor canvas but the technique looked very similar on all surfaces. 

Having the decision made to use all four surfaces left me thinking and thinking day and night - hehehehe - yep!!  - what to do.  I tried various things... and here is the one I almost went with...


It was a vintage lady stamp and then two of dress forms from the Tim Holtz Idea-ology Thrift Shop Ephemera Pack (Click for Funkie Junkie Boutique) - regular and vellum.  But, for me, it distracted from the lovely ombre effect used on the paper surfaces... sooo I put on my thinking cap again.

I really liked the bow that was dyed to match the colors used on the papers so decided to keep that but what else???   All the Curiosity Crew used stamps on their projects so it seems important.  I really wanted the papers to be the focal point.  The Ombre Effect was so pretty that it seems every stamp I took out just detracted. 

In the end... I went with just words. That seems to make the Ombre papers the STAR OF THE SHOW!!!

For the front I used: Stampers Anonymous Worn Text CMS156.  I added just a bit of glitter to the "YOU" with my violet Wink of Stella pen.  


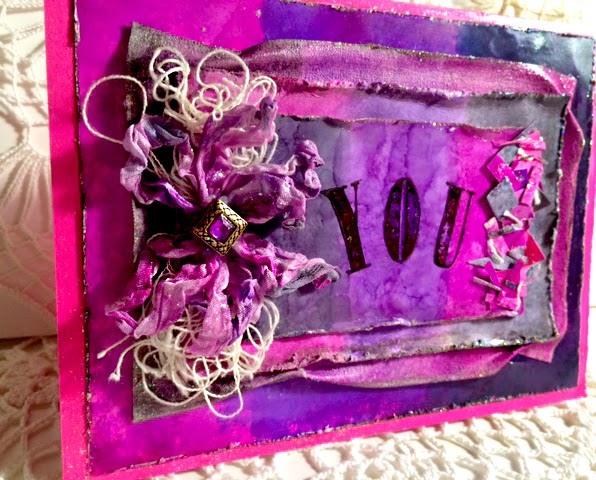
The bow was from Idea-ology Crinkle Ribbon (Funkie Junkie Boutique) stained to match the colors of the papers and canvas. Underneath is some heavy thread that was from a vintage wedding gown under the lace.  The "jewel" was from an old bracelet.


After the inside was finished, I noticed that some of the tiny pieces I had cut from the Ombre Effect papers were just laying on the outside part of the card... (dear me... I wasn't being very careful huh - could have ruined the top -ugh) and it looked rather interesting to me! I took them off - put them on - on, off, etc... and finally decided it was rather fun! It sorta framed the YOU with the bow on the other side. Plus it sorta matched the patchwork on the inside.  Yeah... I didn't waste any of my lovely Ombre Effect papers!!!  Used every last scrap!!!


Oh - and Tim Holtz Distress Glitter (Funkie Junkie Boutique) was added to all the edges of the Ombre Effect layers too.  Wish you could see the sparkle better - just couldn't capture it well.


On to the inside!  Again... it seemed appropriate to keep the Ombre Effect as the STAR!  Off to gather supplies to do another sheet of Ombre Effect paper! This time I needed a large size so I went with some Strathmore Mixed Media Paper. Colors turned out the same!  

The stamped words are from Hero Arts - My Words stamps. You can mix and match words to say what you design them to say! 

For the center, I used scraps from the front of the card.  They were just too pretty to go to waste so I made a little patchwork type box to surround my sentiment. It seemed like it needed just a touch of flare so I added Tim Holtz Idea-ology (metal) Mini Corners (Funkie Junkie Boutique) 

Yes, Yes, I know the mini corners are upside down!  If you go to the link above you can see what the corners really look like in the Funkie Junkie Boutique.  They have a lovely solid front.  But that just overwhelmed my little patchwork playground so I turned them upside down and they were just the tiny touch of metal needed!!!  


I learned a LOT. And I had LOTS of fun!  I am not a good student unless I am motivated.  Sooo it's really wonderful to have the Compendium of Curiosities Challenges to motivate and teach me so many fabulous "Tim" techniques. 

CC3C..... 
YOU make life better!!!!!!!!!
Hugs. joi


==================================================================================================================================================================================================================================================================================================================================================================================================================================================================================================================================================================================================================================================================================================================================================================================

Friday, May 15, 2015

IN THE BEGINNING... the POWER OF ONE was with Snap, Crackle and Pop!

IN THE BEGINNING.... the POWER OF ONE
was with SNAP, CRACKLE and POP!!!

~ ~ ~ ~ ~ ~ ~ ~ ~ ~ ~ ~ ~ ~~ ~ ~ ~ ~ ~ ~
~ ~ ~ ~ ~ ~ ~  ~ ~ ~ ~ ~ ~ ~ ~ ~ ~ ~ ~ ~ 

Howdy!  It's Joi.... surviving a really wet week here... flooding almost washed away one of the new baby calves - never a dull moment at the ranch! 

But here in my little studio creation began.

In the beginning... it was just the POWER OF ONE. 


And then creation began with a little SNAP and CRACKLE.... 
ending with a POP of new life! 


From beginning to end... it was an inspirational journey.  In the beginning...came the seed in my mind the popped up thru the crackled ground of my heart and exploded with a pop into an example of the magnificent, omnipresent POWER of ONE.  


And here is the story...  

I began by prepping the wooden #1 (created here at the ranch) with gesso. Then painted it with Pebeo Precious Gold Irridescent paint.
The goal was to use only one color scheme for the entire project. I chose gold.  Please know that although some of the pictures make it look like there is a greenish tint - there were only shades of light and dark gold colors used in the entire project.  

While waiting for that to dry I begin assembling what I hoped would look rather like a the solar system!  In my "found objects" I had a half metal strip, an old pierced hoop earring, a very long nail, a washer, wire and part of a metal lid.  Together this made "outer space"!  Just nailed the nail right into the wood - so easy!

All the metal for the solar system was painted with Adirondack Alcohol Ink. I used several different shades of golden colors.

Later towards the end of creating - I added the round believe word tag and the little crystal from an old necklace.  There was just something fun about how they could hang from the other pieces.

Then I begin adding some personality - a bit of paper with words on it as well as crackle paste.  Here are some pictures of the crackle up close but most of it got covered up in the end.   After the crackle was dry I went over it with various shades of gold distress paint.


Then using only one stencil and one stamp set on this project...I added the "sunshine" rays to help my little seedling grow and began stamping the letters for the side on grunge board with archival ink. I cut the letters out by hand but cheated a little on the center of the O and the D - just painted it white!!!

I used a big brush pen to color the letters and accented them with Wink of Stella pens for a bit of sparkle. I also used the same pens to accent the sunrays with some shining sparkle after stenciling them with walnut stain distress ink. 


Here is a picture with flash to show the Wink of Stella on the rays! 


Out came the Fiber Paste to which I added burnt umber acrylic paint to make 'mud'!  By then it was getting late and the mud was the exact color of chocolate ice cream. Seriously - it made my mouth water - now HOW silly is that???  I didn't stop to get some of the real stuff though (good girl)!

While the "chocolate" fiber paste was still wet, the seeds were planted.  Yes - they are real seeds and it was a tedious undertaking. 

While my luscious chocolate earth was receiving it's seedling additions (translation... drying!)...  I began fussy cutting out my seedling plant.  Originally I painted the little stem and two leaves onto the wood but of course - there was no dimension so added two more layers of fussy cut card stock stems and leaves. I just drew them by hand and used pitt pens to decorate the veins. Loved finger painting them with silks so their veins would show well and they would have a bit of shine as well as color variation.  I also attached the seedling with glossy accents so that helped with the shine too.


On to the back of the Power of One!  

TIMELESS... that's how I think of anything inspirational and spiritual - TIMELESS.  I painted the timeless die cut with rusty hinge distress ink - which to me is gold when dried and edged it with a black pit pen and white uni-ball pen.


Then began the fun part - the metal!!  I just used old watch findings and a big watch spring.  Around that I added some beads, some filigree metal balls, and even some black snaps.  I set the black beads in clear glass bead texture gel.

Why the snaps???  Ok so it's just a funny thing that came to mind one night as I was trying to go to sleep.  You see...
I had the crackle.... then when I was adding the seeds I inadvertently ran across some popcorn.   Sooooo don't you think I had to have the SNAP too?????  Hehehehehehhe!!! 


I also liked the little Idea-ology Small Talk sticker that says:
'always be on the lookout for the presence of wonder'.
PERFECT. 


At the very top and over the side... is a fussy cut picture of Michelangelo's Creation of Adam.  Just seems right for this piece.


The cheese cloth was sprayed with Gossamer Gold Lindy's Stamp Spray.  I added it because it just reminded me of how everything in our lives from beginning to end is intertwined.  

Added a couple of small rocks from the walking trail at the ranch and I think that completes this mixed media creation!

Thanks bunches for taking the time to stop by and read.  I just love being able to share with my creative and artistic family.
Hugs.j.


---------------------------------------------------------------------------------------------------------------------------------------------------------------------------------------------------------------------------------------------------------------------------------------------------------------------------------------------------------------------------------------------------------------------------------------------------------------------------------------------------------------------------------------------------------------------------------------------------

Thanks bunches for the opportunity to play in the following SUPER FINE challenges:

Artist Trading Post 
ATP Exchange - May Challenge


Found Objects: Rocks, Seeds, Popcorn

From artisttradingpost.com:
archival ink, ranger distress stain, ranger distress ink, glossy accents, idea-ology small talk stickers, golden fiber paste, and more! 

===============================
==================================
==========================================

Mixed Media Place Creative Gym
Exercise 7 - The Power of One
1 Stencil, 1 Stamp, 1 Color by Gayle


I used: Colors of Gold, Crafters Workshop Sunburst Stencil, Stampers Anonymous Worn Text

=========================================
==============================================
==============================================


The Funky Junkie Boutique
Frilly and Funky Challenge Blog
Snap, Crackle, Crackle by Pamellia

Click HERE: Frilly and Funky Challenge, Snap Crackle Crackle


I used Studio 490 Crackle Texture Paste. 
And in keeping with Pamellia's statement that "anything goes as long as it cracks my up"...
since I ran across some popcorn to add in with my seeds...
I decided to also add a SNAP - to complete the old adage...
Snap, Crackle (Crackle) and Pop!!!!  

==================================================
=====================================================
=========================================================

PaperArtsy
2015 Topic #9 Words Challenge by Leandra

CLICK HERE: PaperArtsy Topic #9 Challenge: Words

I used lots of words!!  
Some are tissue paper, some are stamped and then fussy cut, some are on stickers, some are on metal and one is a die cut!  

==========
==============
====================
=========================
==============================
=================================
====================================
=========================================


Friday, May 8, 2015

APRIL SPRAY brings MAY PLAY! Art Journal Page

APRIL SPRAY BRINGS MAY PLAY!  
An Art Journal Creation.  


~ ~ ~ ~ ~ ~ ~ ~ ~ ~ ~ ~ ~ ~ ~ ~ ~ ~ ~ ~ ~ ~ ~
~ ~ ~ ~ ~ ~ ~ ~ ~ ~ ~ ~ ~ ~ ~ ~ ~ ~ ~ ~ ~ ~ ~

This is my first year to do an art journal.  And I need to count but this is just my 5th try at it, I believe.  And... the first one I have actually shared with anyone.  

It's time to leave those April showers umbrellas behind and get on with Spring play time.  My gal is feeling FREE and having FUN riding up and down the road in front of her neighborhood. 

When I was a girl - we always decorated our bikes so I thought it would be fun for her bike to have some spring flowers as decor. 

I also used only THREE COLORS...
yellow, pink and purple.

Here are some of the techniques and tools I used. 
Embossing with Ink and Powders
Spray and Alcohol Inks
Stamping
Stenciling
Fussy Cutting
Drawing
Glitter 
Paints
Gesso
Gel
Glue
Tape
Ribbon
Doilies
Tags
Chipboard
Cord
Cardstock

HERE IS MY PROJECT!


The first step was to emboss the leaves to make a "resist" for the sprays that came next. I used a Kaisercraft "leaves" stencil. Then I used - first yellow spray and then purple spray inks over the embossed leaves.


Here are some of the items I used in my project.
Hot Pink Tags
Purple Satin Ribbon
Doilies
Necklace Cord
Fussy Cut Flowers done with Spray Paints.


The little neighborhood houses I designed myself!!  I tried to make them all a little bit different in shape and used stencils for the roofs.  I drew in the windows and doors then used big brush pens and liquid pearls to enhance each one. 

The fence is purple satin ribbon cut is strips and glued.  It has some liquid pearls and distress paint to give it some dimension. 

And the little gal and her bike I designed on Adobe from a picture and traced onto chipboard. She was a doozie to cut out. Then painted with copic markers, big brush pens and liquid pearls. She also has some glitter on her as does the umbrella!


I made the umbrella with 7 hot pink tags. The handle and top point were made from a purple necklace cord.  The chain on the end of the handle was part of the clasp on the cord!  The embellishment that covers the tag holes is an old piece of jewelry. There is a three layered butterfly resting on the umbrella!!  


The bicycle tires are made from doilies mounted on card stock!  I used alcohol ink on them and around the outside and the spokes, I used purple liquid pearls. 


It was a really fun project but it was a bit challenging using only the three colors! Oh and I forgot to add that I added all the veins to the leaves myself with my big brush pens! I didn't intend to do that in the beginning.  I tried it under where the umbrella was going to see how it looked - knowing I was covering it up - and I liked it!

In the end... the little project makes me happy because it reminds my of my childhood.  We lived in an adorable little neighborhood where every neighbor in a three block radius or more - knew every other neighbor.  Our house was actually PINK!!!  And I LOVED riding my bike all around the neighborhood. I felt FREE.  And Spring was always the most fun season for me to ride! 

HAPPY SPRING TO YOU ALL.  
Hugs. j. 


~ ~ ~ ~ ~ ~ ~ ~ ~ ~ ~ ~ ~ ~ ~ ~ ~ ~ ~ 
~ ~ ~ ~ ~ ~ ~ ~ ~ ~ ~ ~ ~ ~ ~ ~ ~

So excited to have the opportunity to enter this project in the following fun challenges: 
------------------------

PAPERARTSY
2015 Topic 8 - Sprays


And here is the link to their remarkable store too.

Emma's Barcelona project inspired me as well as all the wonderful tutorials and tags from Leandra.  Anneke's tags were breathtakingly lovely.  Nicole had one of the most unique projects ever - wow - those were beautiful.  And Ruth - I seriously cannot wait for an opporunity to try your canvas resist suggestions.  What a lovely journal creation you made. I have just truly enjoyed all the post for the sprays challenge. 

=================================
===================
================================

RUBBER DANCE ART STAMPS
Colors: Purple, Hot Pink, Sunshine Yellow
Theme: Flowers 


And here is a link to their WONDERFUL and unique stamps.


I used only these colors and there are flowers on my girl!! 

------------------------------------------------------
-----------------------------------------------

 MIXED MEDIA MOJO
May 2015 - Tic Tac Toe


I used all of these! Whew.

The word May is in the sentiment: 
April Spray brings May Play - made up by "me"!!!! 

Luckily - I had duck taped the back of some of the chipboard on my girl/bike to hold together some places I had cut to get into other places - otherwise - I wouldn't have had them all!!  

---------------------------------------------------------------
-----------------------------------------------------


---------------------------------------------------------------------------------------------------------------------------------------------------------------------------------------------------------------------------------------------------------------------------------------------------------------------------------


IT'S SPRING Card - Compendium of Curiosity 3, Challenge 27

It's SPRING!!!  YES it IS!!!  
~ ~ ~ ~ ~ ~ ~ ~ ~ ~ ~ ~ ~ ~
~ ~ ~ ~ ~ ~ ~ ~ ~ ~ ~ ~ ~ ~ 

Although my daughter in Prescott AZ said it was snowing there today.  WHAT???!!!! I promise it's spring in Texas!

I made a little card for the Compendium of Curiosity 3, Challenge 27 - Embossing Diffusers.

VIEW HERE: Compendium of Curiosity 3, Challenge 27

This challenge is on page 61 of Vol. 3 of Tim's book - Sizzix Alterations Embossing Diffusers.  If you don't have the book.... here is the link for purchasing a signed copy!  How fun is that??!!!

BUY IT HERE: Compendium of Curiosity 3

And guess what?  YES - there is a gift prize.  EXCITING HUH???!!!  You should see all the wonderful things they have for us in paper craft supplies.  

THANKS BUNCHES Inspiration Emporium for your generosity.  

Click Here For: Inspiration Emporium Paper Craft Supplies


Now...ARE YOU READY for my creation??!! Here ya go!!! 


The Front!


The Inside!

And NOW the REAL Story.....

I cheated - yep - I did :(  BUT... it's all good!!!

I do not have a cutting/embossing machine yet.  However, I just couldn't not participate in the challenge.  It's just sooo much fun to be a part of the Compendium of Curiosity Challenges.  

No worries - I know I can't win because I did not use the proper tools etc but... at least I had fun playing!!! 

Sooooooooooooooooooo I embossed my own card - eheheheh!!
I thought and thought and thought... how could I do it.
Finally I remembered an old needlepoint plastic from the grandkids and I found a wooden awl tool and started rubbing!! 


Now you can laugh when I tell you that by the time I "faux embossed" the card where I wanted it to be embossed... I was out of breath.  Maybe I was holding it - donno... but it was hard work!!! 

I wish I would have taken a picture just the pink cardstock after I finished "embossing" it but I forgot.  :(   But here is a picture of some scraps I cut off the side. 


I used Ranger Aquamarine Archival Ink first over the faux embossing to make it show.  Then I went over it with various shades of silks glaze.  You can sort of see it close up here but the colors are not this bright in reality - more pastel.  


Originally I was just going to put the faux embossed card onto the pastel pink card stock but it just didn't look right so.... I made another layer to match the center that says It's Spring! 


This is a picture of it after I had already put it on the pink card.
I used Neocolor crayons for the background on this and the matching center piece and then spray both with pink and teal ink.
So fun to see how it turned out!!  


I hope you can see that in the center of the faux embossing I left a diffuser place!  It was just plain pink cardstock in the center with the faux embossing all around it.  Then I made the little card to put the sentiment on to go over the pink center.  


The flowers were made for another project that I also just finished and will list next on the blog BUT... in the end, I didn't use them.  I redid the colors just a tiny but and used them for this card - yeah!!!  I fussy cut all the flowers - which I enjoy doing in the evenings. There are 4 pink flowers added that are from prima too.  I also added some purple ribbon - just for another layer.  


IT'S SPRING!!   Enjoy the season!  Hugs. j. 


---------------------------------------------------------------------------------------------------------------------------------------------------------------------------------------------------------------------------------------------------------------------------------------------------------------------------------------------------------------------------------------------------------------------------------------------------------------------------------------------------------------------------------------------------------------------------------------------------------------------------------------------------------------------------------------------------------------------