Thursday, December 10, 2015

THE BIRTHDAY OF THE KING Mixed Media 20x24 Canvas

=============
==================
======================
===========================
===============================

Christmas is fast approaching and for me...
it's the very special celebration of the birthday of Jesus. 

I love to sing (in fact used to solo with Up With People!!) and my favorite solo at Christmas is: Twas the Birthday of the King.
My Mama sang it before me and I carried on the tradition. Wish I knew how to include a little audio for you!!! But here is a picture... as you can see... I get quite into the spirit of the song! Singing praise and worship songs of any kind is instant joy for me!


I said all that.... to say... I loved painting this picture because I sang that song the entire time - along with other Christmas songs! 
Here is my version of "The Birthday of the King". 


The following products were used: 


I began with some texture - adding glass bead gel to the canvas. 


Working on the sky was quite the adventure.  Here is a picture I snapped along the way!  My first color was the very dark DecoArt Prussian Blue Hue. Then it going back and forth from the DecoArt Titanium White and the blue until I made a night sky. 


Here is how the painting looked at quitting time the first day. 


The next time I began adding stamps and stencils.  The sky stencils were the big star in the center and the tiny stars - both stencils were by Plaid.  I got them in a lot of old stencils when I first started painting a year ago - just to have something to work with!  You can see the other one in the picture above. 


The stamps used on this painting are all Rubber Dance Art Stamps.


And no - my acrylic block isn't dirty at all but my pad below sure is!!!  Heheheh! I mix my paints on it and never clean it thoroughly until I'm finished!!  For the swirls in the sky - using this stamp - I used DecoArt Media Titanium White Antiquing Cream - just turned the stamp over in the cream and then added it to the sky. 


Here you can see I added the stamped swirls and some shading to the hills and valleys. 


I wanted texture on the hills and valleys too! 


After the small stars were dry I highlighted them with DecoArt  Radiant Red Metallic Lustre. And a bit on the big star too!


Then I began adding the town of Bethlehem! I drew the palm tree with my ever present Faber-Castell Big Brush and Pitt Pens.  The palms are with Prussian Blue Hue. The trunk with Naphthal Red and Quinacridone Gold (which is more red than gold). 


I love trying to use my stamps in crazy ways so I made the city with the help of more Rubber Dance Stamps! 


Then I painted in the little town as my imaginations saw it! 


Now if you laughed when you saw my sheep - it's ok because they are very unique!!! But at least I was brave enough to draw them.  I should have had a sheep stamp - you are so right!  Well... ok - a manger scene stamp would have been great too!!!!!!!! 


The last accent was to add DecoArt Glamour Dust. If you haven't tried it - you should. But then, I love glitz and glam and sparkle so it ends up in a LOT of my projects! 


I am blessed to be able to paint picture of how I imaged Bethlehem might have looked when Christ was born. 


Even the sides are fun to do and to see!!!


Happy, blessed, and especially meaningful Christmas to you all. 
With Love, j.


~ ~ ~ ~ ~ 


Excited to enter this painting in the following challenges: 

"Tis the Season" for the Star of Bethlehem! 
---------------------------------------

Wish Upon A Star

I wished on my star.... 
for you ALL to have a Blessed Holiday Season!
________________________________________________________

Take It Make It Challenge - December
Sharing the Season
___________________________________________


Creative Team Blog
'Christmas' Challenge


================================
=============================
========================
====================
==============

Tuesday, December 1, 2015

I DID IT!!! LAST ONE! Tim Holtz 12 Tags 2015 December

=========
============
================
=====================
=========================

I did it!! I did it!!! I did it!!!!!!!!!  

#12 of Tim's 12 Tags of 2015!!!!!!!!  

When I began in January... I had sincere doubts I would get to do all twelve due to health challenges.  I am so grateful to be typing this to you now.... saying that I MADE IT!! I did it!!!! 
I'm grateful and blessed!  

I guess I should put them all out in a row and get a picture.
Didn't even think of that... hmmm - ok... hold on.... ok.. done!

Here they are... yeah!!! Wow. Can't believe it!!!
And all before the deadline... but I will admit...
a couple were like one minute before the linky closed!! 


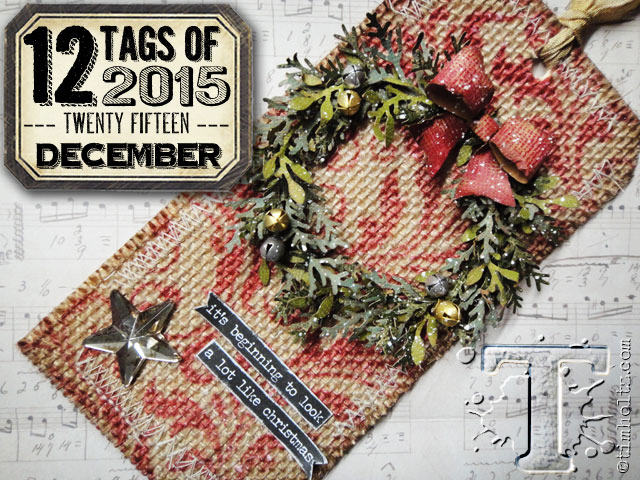
And here is the December Tag!!


I totally loved doing this one. Painting on the burlap was just tooo fun and looks so neat too!  First I cut the burlap to match my tag!


I used a stencil that came in a lot of old stencils so it has no name.
I followed Tim's instructions - put the burlap on a paper towel and sprayed with Ranger Distress Spray Stain Fired Brick. 


While that was drying I began cutting out the leaves with my Vagabond. I didn't have the set Tim used in his tutorial so I improvised with a leaf die I already had on hand! 
Quickutz Leafy Vine with Tim Holtz Kraft-Core Cardstock.


Before I cut - I sanded each piece!


And here are my leaves... then I began putting together my wreath!


The wreath has Ranger Stickles in copper and crystal ice. I used some an old necklace from my stash that had some jewels attached to the chain for decor of the wreath. I also had some star charms and some rhinestone bling!  

Oh and the bow.... didn't have the die so just followed Tim's pattern from his tutorial and cut it out as best I could. I have never made a paper bow before like this - challenging!


The red balls are silver filigree balls I painted with Ranger Watermelon Alcohol Ink!


Hubby sliced me a piece of cedar wood from the ranch and I added a small picture/sentiment from Tim Holtz Idea-ology Christmas Paper Stash.  It's the red square at the bottom left in the picture below.  I fussy cut out the ivy and added it to each side of the Christmas Greeting sentiment!  I added Stickles to it also!

And of course the edges of the wood as well as all the paper/burlap etc are all done with Ranger Distress Inks. 


And that about sums it up.  


This is the back with another piece of Tim's Christmas paper on it!!  


Thanks bunches for sharing my excitement.  And yes... I did it fast - early - just so I could be sure and complete my set of 12!!!
Still smiling big.... Wow.  I did it. I made it. Heheheheh!!! 
Hugs to you all! j. 


~ ~ ~ ~ ~
I would like to share this project with: 
----------------
December

Thank you so much Tim and Mario for this monthly challenge. For me (just doing this type of art work for a little over a year) it was exactly that - challenging.  I was so humbled and thrilled to be one of your winners early in the year.  Sorta too the pressure of perfection down a notch or two for me!!!  It's been WONDERFUL being with you.  Merry Christmas to you both. XO j. 


________________________

MIXED MEDIA PLACE
Creative Gym - Exercise 14

Create A Christmas Card, Tag or ATC

I'm not the best at cards so sharing a tag instead!! 

__________________________
Stamplorations
Artplorations Stencil Blog Hop


December Flash Stencil Linky Party

________________________________________


We don't have a tree but I have all my little Christmas projects ornamentally displayed here in my studio including this tag. 
It's about as ornamental as I get!!  But I am proud of it! j. 

=========================
======================
===================
==============
======

Monday, November 30, 2015

12 Tags 2015 November

========
============
===============
===================
======================

When I started Tim's 12 Tags for 2015 - due to challenges - I wondered if I would get all 12 done!!  I can't believe this is number 11.  I am sooooo soooo happy to have one more to go!!! Maybe I will do it early - eheheheh!!!! Imagine that!!!!  


I followed Tim's examples the best I could. Unwittingly, I started out with smaller tags in Jan and since I wanted them to all look alike I have stuck to the smaller size.  BUT... it has made it more difficult to make it like Tim's example!  

I didn't get a lot of pictures - had too much fun playing!!!

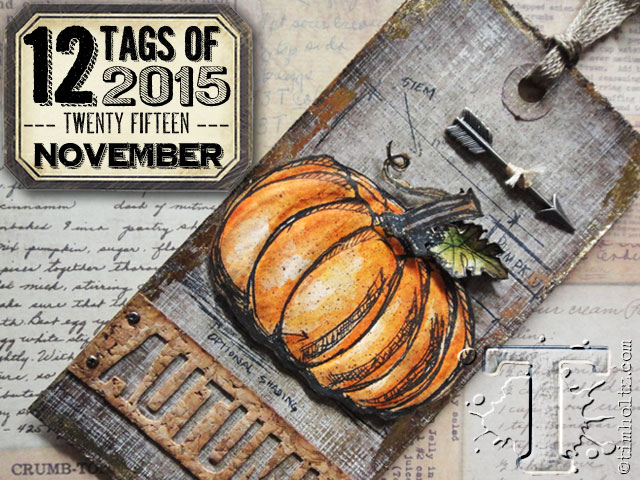
This was my background!


I added the foil with the glue n seal instead of the glue stick.  

It was really fun making my pumpkin look puffy with the foam and stylus. It is smaller than Tim's pumpkin so not so easy to tell the puffs but they are there! 


The AUTUMN die letters were all too big so I just used my cork another way! I DO love using these texture surfaces though.  The cork is perfect for this project!


I used the cork under the Count Your Blessings - which came from Echo Park Fall Reflections paper. Of course, you can tell that the word Autumn is also on cork. 


The leaves are metal charms and there is some twine under the pumpkin that was stained with Ranger ink.

Below you can see there is dimension to the project!


And this it the back of the tag.  I am blessed - especially to have all of you to call friends and to share artwork with.  I enjoy seeing your fabulous creations each day. 


As always - thanks bunches and bunches for taking time to stop by and see me. You have no idea how much it means to me.  

One of these days I hope blogger will fix my "reply" button so I can thank you for your comments. I tried - no luck. 

Big hugs. j. 


This is for:


======================
==================
=============
===========
========