Wednesday, March 23, 2016

DecoArt Mixed Media Design Team - Gratefully Honored.


========
===========
==============
===================
=======================

 Howdy to all my artistic sweeties!!!

Yesterday a special announcement was made by:
DecoArt Inc. and now I get to share it with you!

So honored and grateful to be a part of the:
DecoArt Mixed Media International Design Team. 

THANK YOU DecoArt. 
I made a little color wheel thank you project - just for you!!
Thank you from my heart!


As most of you know... many years ago... I decided it was just easier to stop dreaming.  Somehow it made life more normal - more even keeled for me.  I learned to bloom where I was planted - find contentment in the moment and I was happy.

When I began painting, I saw all these projects that said DREAM and BELIEVE etc.  And sentiments (phrases) that encouraged dreaming and flying and conquering fears. But still... I held back on allowing myself to dream. 

Then, thru Tracy Weinzapfel Studios, I found DecoArt and completely fell in love with the paints and the people associated with the company.  I tried every type of paint out there - from the very expensive to the very inexpensive. DecoArt was and still is my favorite and especially the media line! 

The more I became familiar with the company, the more excited I got about all the products.  And then came the challenges - what??? They have challenges too - how incredible is that!!!!???? 

And that is when I began to DREAM.  But I didn't share it with anyone.... for a long long time.  And then one day, when I was writing a comment on Tracy Weinzapfel's blog... I admitted that I had a tiny dream. I did not tell her what it was though.  

What was that dream????  
Yep, you guessed it... to win a DecoArt challenge.
I DARED TO DREAM...
and even now as I say it... I have tears in my eyes.
Beyond my wildest imaginings.....
I WON a DecoArt challenge. 
And then.... dear me... I won another DecoArt challenge.
(And no - Tracy was not one of the judges - I promise!)
You have no idea how stunned I was by that time.

And now... the rest is history. 
I feel like no one on the planet could be more grateful for this opportunity than I (of course, that's not true - eheheheh) but my heart is just overflowing with deep deep gratitude.  

Yes - I admit - fear creeps in and tries to tell my I'm not good enough and I can't do this but you know what... I am taking those thoughts captive and replacing them with visions of the next project I will do for the DecoArt Mixed Media Blog!!!  


If you are not following the DecoArt Mixed Media Blog... 
click the link... you don't want to miss out!!! 

And here are some close up pictures of my 
THANK YOU DecoArt 
project! It was done in my (almost full) art journal. 


This was just done as a playful thank you to DecoArt so I didn't take process pictures. It wasn't even meant to be perfect or pristine. It was just done for fun out of my delight and excitement for this opportunity. It's just playing with the various DecoArt Media line acrylic paints - as you can see in the picture. 

Of course, DecoArt makes all sorts of different kinds of paints.  No need to limit yourself to the Media line at all.  Go explore all the possibilities and products they have at DecoArt.com.

I began with DecoArt Media Gesso - of course! Sometimes I used a mix of two colors or some DecoArt Media Tinting Base to make the color variations on the wheel.

If you look at the photo with the products in it you will so a syringe beside the DecoArt Media Liquid Glass.  Yes, I know - yucky syringe but out here on the ranch - it's just part of the life of a cow!!! I use the left overs in art work!!! Adding the paint color mixed from my color wheel to the syringe - it was then squirted to make the funky swirls around the outside of the color wheel.  Shimmery and shiny swirls!!! 

I also used the DecoArt Media Liquid Glass over the color wheel colors to add depth and bling to the colors of the color wheel. 

And the sentiment is so true for me... and for you, I bet...
"I found I could say with colors and shapes...
things I couldn't say any other way."

Today I am 'saying' thank you to DecoArt from my heart!


Thank you so much for stopping by! I sooo love your comments. 

And no worries, I will still use lots of other products too.  Mixed media is what I love and there are lots of wonderful products and brands that all fit together nicely to make wonderful ART!!

Congratulations to my sweet friend Brenda Brown who also became a DecoArt Media DT member yesterday too!!! 

Hugs. joi


=======================
===================
================
==============
==========

Friday, March 18, 2016

Easter Lily on Pink with Elegant Writer


=========
==============
===============
==================
====================

Howdy from the ranch! 
Here's another Easter Lily done with a pink background this time.
Just for fun, I sketched this with my Elegant Writer pen!


The pencil sketch. This is on an 8 x 10 canvas.  


Then drew over the pencil with my Elegant Writer pen.


With the Elegant Writer - when you add water - the ink turns various shades of pink and blue depending how you blot it. 

Here you can see the shades from the pen.
 Also began adding some green paint in the center. 


Once satisfied with the Lily I began the background.

Using DecoArt Americana Carousel Pink Acrylic Paint mixed with DecoArt Media White Tinting Base... created a lovely pastel pink.  Adding Kosher salt to the paint while wet works well to make a chalky type finish for the background. 


After dry, brush off the salt and you have a texture background!


Thanks bunches for taking time to chat!!
I so love it when you do! 
Hugs. j. 


====================
==================
================
============
========

Thursday, March 17, 2016

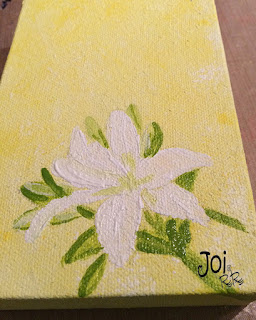
EASTER LILY on YELLOW Painting on Canvas


=========
=========== 
============== 
================== 
===================== 

Howdy sweet creative friends! 

Easter is almost here. Wow.

A few weeks ago I was commissioned to make Easter Lilies.

They were to be all an white lily in the center bottom of the painting. They were to have pastel backgrounds in either pink, blue or yellow.  And then - they would pick which the liked best. 

The first instructions said a chalky pastel background.  
The second set of instructions said  - need some contemporary.

Well, needless to say... I just started painting Easter Lilies!!!  
In the end, I came up with quite the selection. 

Here is one of them!


I began with the background, of course! 

DecoArt Media Fluid Acrylics in:
Titanium White
Primary Yellow
Hansa Yellow Light

I used a sponge dabber for the "chalky" effect!


I drew on my lily after scanning the web to figure out what a lily looks like!!!  I printed off about 20 different lilies to get an idea of which way to put the leaves and what the stalks looked like!


Then I began painting it in. First with white gesso - leaving a few ridges on the petals with the gesso. And then adding color. 


It is not as easy as you might think to paint a solid white lily. It would pretty much look like the one above done in gesso without some highlights. I recently did an orange tiger lily and it was a breeze compared to an all white lily.  When I first started trying to highlight the leaves - it was easy but before I knew it the leaves were no longer white!!!  I just kept adding layers for shadows!  


This was the first one I tried which made the rest a bit easier!!  
Trial and error - another learning adventure!


Hopefully I can share a few more of the lilies with you in the next few days because Easter is on the near horizon.  

Thanks bunches for stopping by. 
I hope you know how much I appreciate you.
Hugs. j.


===================== 
================== 
============== 
========= 
=========

Friday, March 11, 2016

BUNNY GIRL ART DOLL!

==============
================
=====================
========================
===========================
Howdy Sweet Friends!

This is my first ever Art Doll.

Wanna know a secret... I decided long ago that I never wanted to make one of these Art Dolls.  It was beyond me to even fathom being patient enough to figure out the wonders of Art Doll Art!!!! 

I also learned, along this artsy journey, that just as soon as you say you don't want to do something - you end up doing it!! Why??
Ya know... it's just one of those crazy comfort zone scenarios!!

So here is my Doll with her little friend at her feet.

Please allow me to say this though...then I'll feel better. 
I have seen some FABULOUS Art Doll makes. 
Art Dolls that have completely left me in awe.  
THIS IS NOT ONE OF THEM :) 
But the artistic endeavor was a fun challenge.


Hubby brought me the metal pieces! As you know, I get barn left overs!  Plus he made the wooden base for me at Christmas to make a vintage jewelry Christmas tree - this one was extra!


The Corrugated Sheet of Black Cardboard is by Fancy Pants Designs.  I began by painting it with DecoArt Media Interference Paints in Turquoise, Blue and Violet. 


Love this big spring - or coil - it has no "spring" to it!!! It's hard as a rock. Doesn't it look like a body part to you - eheheheh??? Painting it to match the cardboard with Ranger Adirondack Alcohol Inks in Wild Plum, Stream, Purple Twilight and Sail Boat Blue. 

I used the same colors to paint the springs used for her arms.
Adding Salmon Ink for her hands!


Gonna stuff my tummy with some shimmering tensil!!  What do they call those things in our tummy - 'villi' - tiny fingers! 


And here is some of the lace type items that adorned Bunny Girl!! 


Originally I cut out a vintage face to use on the metal - spoon type piece. Hubby had no idea what it came off of - perhaps part of a clock?  But it was just too pretty to cover up with paper so I painted the face with DecoArt Media Acrylic paints.  I'm really happy that the shimmery gold of the metal piece still shows.

Yes - I know - she's a bit quirky looking and definitely must have a pea brain since her head is flat but hey... we are all wondrously and uniquely made!!!  

And I had this long strand of hair - better known as an "extension" from the granddaughters Christmas stocking stuffers!!  I looped some teal wire around it for a bit of a decor and added the little "mop" hat out of matching lace from her shawl. 


The body was put together with a dowel. And the little bunny is a Vintage Brooch that my Grammie used to wear! 


YES - that is supposed to be a vintage "bustle" behind her!!!  


You are so sweet to stop by and see my humble Bunny Girl. 
She was quite the adventure in art for me!!! 

Hugs. j. 


~ ~ ~ ~ ~
Happily entering the following challenges: 
------------------------

Lace, Metal, Cardboard 

===========================
========================
=====================
==================
============

Wednesday, March 9, 2016

SHINING CRAZY for COLOR & CHARACTER


=========
===============
=====================
===========================
==============================


Howdy Honey... (my fav ranch welcome) to my Artsy Honies!!!

It's been pouring rain here all week long; dreary and dull.
So I am "crazy for color" and sunshine!!
Here is my 12 x 12 canvas - making my studio brighter :)


This painting was inspired by Tracy Weinzapfel Studios. On May 15, 2015  Tracy painted a really fun "POD" creation LIVE on her Mixed Media Monday's broadcast. I am always awed by the way this little gal can paint LIVE. It really is amazing to watch - truly such a great gift.  At the time, I knew I wanted to try to paint some pods someday that were as fun as her lovely project. I finally did!!! 

 Here is Tracy's gorgeous work.


THANK YOU TRACY for your fabulous inspiration! j. 

And it also seemed appropriate to use one of her Dare2B Artzy Totally Tracy stamps too!

I have always loved the way this particular 'shine' stamp weaves up and down so I made a fun little creature for my garden in the same shape as Tracy's stamp.  To me, it's an inch worm! Hubby says it's a gecko!  Perhaps something in between!


I began with a 'Flourishes' stencil from ARTplorations using DecoArt Media Texture Sand Paste. I just love using this - it has such a gritty but still fluffy feel to it. 


My sun was made with DecoArt Media White Gesso.  It was a new bottle and when I took the paper off the top there was the neatest design from the paste.  I just turned it over and made the center of my sun - so fun - eheheheeheh!!!  Then finger painted the rays!


After the Texture Sand Paste was dry I added DecoArt Metallic Lustre Brilliant Turquoise and Radiant Red to the sun and grass.


After the Metallic Lustre was dry... out came the DecoArt Americana NEONS Fluorescent Acrylics bright Thermal Green!


For the sun, DecoArt Media Shimmer Mister in yellow. Love these misters because they are permanent and the colors are WOW!! 


Here are the DecoArt Americana Acrylic Paints used to complete background and the pods:
Bright Orange
Cadmium Yellow
True Red
Carousel Pink
Sour Apple
Desert Turquoise
Lavender


After the background was complete it was time to work on what I hoped would be the star of the show.... the PODS!!! 
I painted them in with DecoArt Media White Gesso. 


Heheheh - it was so fun... decorating these little pods!! 

And after they were done... I decided to use one of my favorite products - DecoArt Media Crackle Glaze.  See how battered my jar is - eheheheh - almost time to order a new one.  I spread it over the grass, stems and pods - leaving it to dry overnight.


Out come the DecoArt Media Antiquing Cream in Patina Green. 
Apply it over the Crackle Glaze (as seen in pics below). Then wipe and look at those lusciously glazed cracks!!


You KNOW I just HAD to add DecoArt Champagne Glamour Dust to the sun. I tried to slap my hand but so love the shimmer!! 


This project was ALL DecoArt products. Much to my surprise, I even followed Tracy's example and outlined with my liner brush. You are right Tracy...a good liner brush makes all the difference!!  


Just a few close-ups for the road!! 


THANKS BUNCHES AND BUNCHES for stopping by. 
Remember my 'reply' button still doesn't work - but if it did...
I would say YOU ARE THE BEST and your comments are very special to me :)   HUGS, j


~ ~ ~ ~ ~

So excited to enter the following challenges:
============


=====================


==============================
============================
========================
====================
=================