Friday, September 16, 2016

A Walk In The Park, Crafty Individuals & DecoArt


HOWDY from Joi at RR!

A few months ago I was so excited to be asked to do a sponsor spotlight for Crafty Individuals.  Some of you may have seen it but many of you didn't so: here is my recap!!! 

Hubby made a nice cedar stand for this creation.  We sent it to our sweet friends in Florida. They have a tiny little white Javanese puppy and live in a resort community. Seems perfect!!!


Below are the three wonderful Crafty Individuals products used.

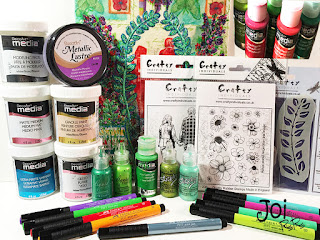
Flower Heads - Rubber Stamp, Code CI-206
A Walk In The Park - Rubber Stamp, Code CI-439
Leafy Branches Mask, Code CI MASK23-LB
Picture taken after I cut the Leafy Branches Mask to use!! 


And here is my creation! 


I began with a napkin!!


Using DecoArt Decou-Page, the napkin was added to an 8x10 canvas board. Matching tissue paper from my stash seemed to be super colors for the bottom half and it had some shimmer too! 


Finished gluing - and here is the result!


Mixing DecoArt Media Yellow-Green Light Fluid Acrylics with DecoArt Media Crackle Paint, created the color for the path.   


Using a palette knife to spread the pathway and a credit card to make the grass tufts....

 Vio-la...... the crackled pathway emerged. 


Gently wiping on DecoArt Majestic Purple Metallic Lustre with my finger... the cracks were accented. 


Using some more of the Yellow-Green Light paint and my long haired brush - some more grass tufts appeared. 


Using Staz-On inks... I began using the stamp sets from Crafty Individuals.


Actually, I'm not sure why I stamped the Crafty Individuals "Walk In The Park" couple in red... just picked it up first and thought - why not.  Imagine my surprise when it was the red that made it onto the canvas.  So wild but it just seemed to be "right"!   

The stamped Crafty Individuals "Flowers Heads" were decorated with my ever faithful Faber-Castell Pitt Pens.


There were a few pieces of the napkin left, so here you see the cut-out pieces that were decopaged onto the board here and there. 
Hehehehhe - almost used every inch of that napkin! 


Using DecoArt Media Modeling Paste and the Crafty Individuals "Leafy Branches" Mask.... the archway began. In the picture below - one side is already done - and the other side is in process with the mask still attached.


Then, began the painting!! 

You can also see in this picture that the Hero Arts stamp - "appreciate WHAT IS" - was used . . . . 


The archway needed to look "special," so out came some Ranger Stickles and Liquid Pearls, to add that beautiful shimmer!


In the end...  I just couldn't stop my paint brush from hopping into my hand.  Before I knew it... the long the bunches of flowers became flowering trees!!!! 


I added a few jewels from my stash near the horizon line! 


These pictures were taken in hopes that perhaps you can see some of the glitter and shimmer of the piece. 


And here are some pictures of the finished piece. 


So happy to see the crackle thru the lovely flowers!!! 


Products Used:


Thanks bunches to Crafty Individuals for giving me this opportunity to play with such nice quality stamps and masks. It was an adventure in creativity for me!

Remember....
"APPRECIATE WHAT IS"
Even on the most challenging days . . . we can all find something to appreciate each day and be thankful :)
Big Hugs. j

=======================

Tuesday, September 6, 2016

My Brother's Dream... Inspirational 24x20 Canvas

======
========
=============
===================
=========================

Hello again to all my sweet creative friends!  

Today I have a special painting for you because it evolved into something a long way from how it began!!!! 


Originally, in my mind, I saw two paths leading into the woods and where they met - was a beautiful flowering tree.  The intention was for a bright, jewel tone, abstract creation.  I began by sketching in what I had in my mind.  A beautiful flowering tree would have been far back area in the center of the woods - so originally there was an open blank white space left there for the tree.


This painting is a 20 x 24 acrylic on canvas. 


At this point, my brother called and asked what I was painting. I explained and told him it was just at the beginning. He asked me to text him a picture. I had already snapped the picture above so that's what I sent to him.  His told me that it looked like his dream of the entrance to heaven. 

My sweet brother is a year younger than I and we grew up as "partners in crime"!  He lives in my hometown in Missouri. I don't see him very often but of course, we talk and we are close.


He has pancreatic cancer so his sharing his dream of heaven touched my heart.  I had no idea how to make his heavenly dream a reality so I just started painting again with that possibility in mind.

I had already covered the painting in plastic wrap before I talked to my brother and it was in the process of drying. The goal was just to blend the colors and make it more abstract.  


This painting was done with Ranger Dylusions Paints in every color they have available! It still has the plastic wrap on here.


And after it was removed....


It actually was probably prettier before the plastic wrap phase!
However... if I hadn't added the plastic wrap - I wouldn't have found the angels.  Angels??? After the conversation with my brother, I set the painting in front of me during the evening trying to think how to proceed towards the theme he stated.  And I couldn't believe my eyes when I found the angel on the left - so vivid - Wow.  And then... yes, there it was - another angel on the right. I took out my Stabilo All pencil and drew around them. 


Look at the texture from the plastic wrap!  It almost looks like light streaming inside and out of the angels?  Truly amazing to me!


So with the discovery of the angels - it can now qualify as an INTUITIVE painting - which as you know... I love to do!!!! 


Still not sure how to proceed so let's just outline the angels!!!


Then came out the stamps, stencils, Archival & Stazon Inks! 
I just began adding other worldly texture all over.

This is Ranger Dylusions Stencil - Shattered.


This is Ranger Dylusions Stencil - Bubbles. 


I also used the following stencils:
~ The Crafter's Workshop - Mini Subway
~ Stampers Anonymous, Tim Holtz Collection - Speckles
~ Hero Arts Clings Stamp - Canvas Stripes
as well as... 
~ Ranger Archival Ink for the road/path. 


Here is a picture of the stamps and stencils used in this project.
The Inkadinkadoo Stamp was used for the front of the gate.


From this point on - I just began to play and experiment. Over a period of days... I would stop and start again adding layers.

Somewhere along the line I added DecoArt Media Crackle Paste to the "hole" at the end of the road and DecoArt Media Crackle Glaze to the angels. 


Plus I added many other products to enhance the painting: 
DecoArt Antiquing Cream, Metallic Lustre and Glamour Dust to parts of the painting. As well as some Ranger Stickles.


Colourarte Silks Acrylic Glaze in a variety of colors were used throughout the painting too.  Love the Iridescent Silks on the darker colors like the angels - so fun to see it turn from white to a color. 


 DecoArt Metallic Lustre Rose Gold did an amazing job on the crackle texture. 


Layering and adding - little by little - creating the scene!


In the middle of the night one night I woke up with the idea to add the gate/fence.  No idea where or how but the next day, I was up to the task.  It was tedious - just using my ruler!  And the gates were the hardest - you can see that they don't match perfectly but it's ok - it's just a dream!!!  I did use a stamp on the center of the gate. 


There was just something about the road/path that didn't look right to me.  I wasn't sure how to add the stairs so again... I just started sketching with my Stabilo All pencil and a ruler.  Whew - was there a lot of erasing!!  After adding the stairs... I knew it was nearly done!  

Just needed the streams of heavenly light. Using DecoArt Metallic Lustre & Glamour Dust, I tentatively added one streak of light and liked it... so using my finger as well as an old credit card... proceeded adding one streak after another. Hehehe - so fun!!!


Of course, with all the glimmer and glitz it was hard to capture the painting at it's best! With light shining on it - it's very vibrant and rich.  In natural light it is serene and peaceful! 

Never would I have imagined this turning out the way it did when I began. It brought my brother happiness so for that I am grateful.  I did a lot of happy singing while painting this one too! 

There is a song by Michael English and the first verse is: 
I dreamed of a city called Glory
So bright and so fair.
When I entered the gates I cried "Holy"
The angels all met me there...

As always - thank you sweet friends for taking time to stop by! 
May your dreams be full of glorious light! Hugs. j.


~ ~ ~ ~ ~ 

Excited to add this to these challenges: 
It's true! Dreams if they're any good are always a little bit crazy! But personally, I think my brother's dream of heaven is super.  I hope to meet him there someday :)  Thanks bunches Mixed Media Place for allowing me to play along with your dream theme. 

~ ~ ~ ~ ~
Frilly and Funky Challenge Blog
September: Things With Wings


Not butterflies or birds but definitely wings. Plus heaven is timeless so hoping this will fit the vintage category too!!
Thrilled to have the opportunity to participate this time. 

======================
==================
======================
===================
==========